 The garage is designed to store a vehicle. In most cases, this rule is violated and all kinds of tools and other items are stored in it. The result is one large and cluttered room. A good owner in the garage can put a lot of things and they lie there very neatly. How to achieve this? Everything is extremely simple. It is necessary to make special racks or shelves on which everything can be neatly placed.You can make a rack and shelves in the garage with your own hands - we will consider options, photos and drawings in this article.Do you want everything in your garage to be in place? It is in your power, just do not put off your plans for later. Act immediately and you will certainly succeed.
DIY craftsmanship
There are several options for the implementation of shelves in the garage. It:
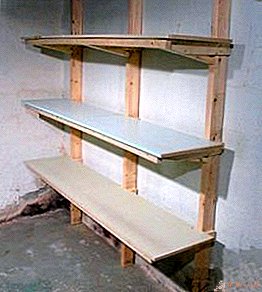
- Stationary structures. You can say they are the most common. It is they who are increasingly being chosen to store a wide variety of things. Of the features it is worth noting that the load is evenly distributed on the floor, since the structure is installed directly on it. If you decide to independently carry out such a rack, you will certainly succeed, there is nothing complicated in the task.
REFERENCE. If you plan to store heavy objects, it is better to give preference to a metal structure, otherwise, wooden will be enough.
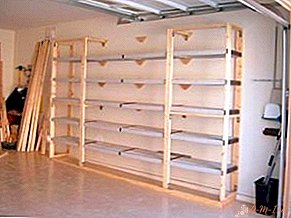
 Prefabricated - collapsible structures. What is their main difference from the described construction? It's pretty simple. They are made of perforated material, and the shelves on them are assembled like a puzzle. Everything is extremely simple and convenient. Cope even an amateur in this matter.
- Mobile structures. They are carried out with wheels, therefore, you can move them to the place you need. You do not have to unload them for this. There are restrictions on permissible weight. It will not be difficult to buy such a rack and simply assemble it in the required place.
- Rotating design. It is safe to say that this option is very convenient for the wizard. You can store a lot of tools on it and, if necessary, get access to it very quickly. This is all with a compact design.
- Wall shelves. With their help, you can rationally use the space in the room. They can be performed at a convenient level, so as not to interfere with moving around the garage or park a car. Installation is carried out using fasteners.
 Prefabricated - collapsible structures. What is their main difference from the described construction? It's pretty simple. They are made of perforated material, and the shelves on them are assembled like a puzzle. Everything is extremely simple and convenient. Cope even an amateur in this matter.
Transform your garage
First you will need to do a project. Decide what designs you will need and in what quantity. Measure how much free space you have.It will be convenient to completely empty one wall of the garage and assemble racks or make shelves near it. Calculate how many shelves you need and for what purposes, their size will depend on this.
Most often, home masters do the following:
 Calculate the length of the structure along the entire length of the wall of the room.
- Do maximum as well.
- The width of the shelves should be determined based on the severity of the cargo that you plan to store on them. This indicator should be no more than 150 cm, most often it is 100 cm.
- The depth of the shelves is usually carried out with a size of 50-60 cm. To do this indicator is much larger - impractical.
- The height of the shelves is from 25 to 60 cm, for storing large things, you can increase this parameter 80-100 cm.
 Calculate the length of the structure along the entire length of the wall of the room.
Prefabricated structures
This is a very simple assembly option. You don’t have to do anything complicated. Just buy a suitable structure and assemble it in place. As a rule, galvanized metal with a paintwork or polymer coating is used for their manufacture.
REFERENCE. Thanks to the perforation of the racks, the shelves can be installed at any height convenient for you.
These designs are resistant to corrosion and mold. It is also worth noting fire safety, which is very important. Some designs imply the possibility of installing wooden shelves.

IMPORTANT. It is convenient to assemble such a structure in a horizontal position and only after that it can be lifted and installed in place.
Robust construction
If you want to make really strong and reliable designs, you should choose the most reliable materials that can withstand heavy loads.
Racks can be made of a metal corner or a rectangular profile. Do not choose too large a size, 40 mm will be enough. Create a frame on which, in the end, the shelves will be attached.
IMPORTANT. Fastening the shelves to the frame can be done by welding or by bolts.
For shelves you will need a wooden board with a thickness of 15-25 mm, strength depends on this indicator.
REFERENCE. Wooden materials must be painted over or a different method of protection against fungus should be chosen.
The algorithm of your actions should be as follows:
- Prepare in advance the materials and tools that you may need in the process.
- Next, prepare all the details in accordance with the planned dimensions.
- It is necessary to determine at what level the shelves will be executed. Mark up.
- Weld the corners - shelf frame to the uprights. At this stage, it is very important to control the horizontal position of the elements.
- When the frame is ready, it must be primed and painted over to protect it from corrosion.
- Now you can proceed to the implementation of the shelves. They can be located along or across the frame.

Securely fasten the shelves with self-tapping screws. Make sure that the structure you assembled is securely attached to the wall, this is important, because the structure can fall over for various reasons, thereby damaging the car.
Wooden structure
Such shelving is usually done when there is a desire to save on materials. To create vertical racks, you need to purchase a 100 mm burs, not less. For shelves, a board of 15-25 mm is suitable or it can be plywood, chipboard.
IMPORTANT. Wooden racks are very durable structures, but the load rating is much lower compared to metal. Also, the fire hazard is very high.
To mount the shelves on such a frame, metal fastening angles and M5 bolts 60 mm long are used.

DIY craftsmanship
Shelves in the garage can be made with your own hands starting from the very initial stage, or you can purchase a ready-made structure and simply fix it in the place you need.
Hinged shelf
 To mount such shelves, you must use special brackets. They can be of various shapes. Your task is to choose those that can maximally compensate for the load pressure, as well as distribute the load across the entire surface of the wall. For fastening you need to measure a horizontal line on the wall, focusing on it and you will attach the bracket in the future.It is recommended to use an anchor for installation, it is more reliable than the choice of self-tapping screws. When all the necessary fasteners are installed in their place, you can proceed to the installation of the shelf, which can be wooden or plywood.
IMPORTANT. To make the structure more durable, first you need to mount the corners 15x15 mm, and already place a shelf on top of them. This solution will avoid the likelihood of deflection of the shelf under the weight of the load.
Tool Shelf
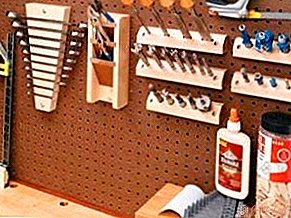
Understood the usual shelf and racks, but what about a small tool? It can be just as conveniently placed on a shelf, only unusual. This is a special shield shelf.
Also, designs can not be attributed to the category of products with high load capacity or strength, but they are very convenient for placing a small tool, which should always be at hand.
Do not overload such a design. The consequences will be unpleasant. The height should correspond to the height of the one who will use the shelf. Its upper edge should not be higher than a person’s height.
To make this convenient design, follow the following algorithm of actions:
 To begin with, decide on the dimensions that are convenient for you and suitable for the dimensions of your garage.
- Make a shield. For this purpose, plywood material is quite suitable.
- Using a jigsaw, cut shelves with side walls.
- When using long screws, assemble the structure and attach it to the shield. This will be a place to store small jars with bolts.
- To place tools in the future, attach threaded hooks to the shield. Try to think about a place for each tool in advance. This will allow you to rationally place the hooks.
- To fix the structure you created on the wall, attach the brackets on the back side. Fix directly to the wall.
 To begin with, decide on the dimensions that are convenient for you and suitable for the dimensions of your garage.
Following the above algorithm, you can quite simply perform such a convenient shelf in your garage, where everything will be in place.
Leave Your Comment