 Long-burning boilers became in demand with the growth of private housing construction. Buying an industrial heating device costs a considerable amount. Do-it-yourself boilers allow you to reduce costs. A competent drawing, the ability to correctly figure it out, carefully following the instructions will help any potential user to carry out this task.
This group includes heat generators with a furnace, the dimensions of which are increased compared to ordinary models. A larger amount of solid fuel provides a longer burning time and a greater amount of heat generated. Manufacturers offer ready-made boilers with the following indicators for the duration of fuel combustion until its next tab:
- firewood and wood industry waste - up to 12 hours;
- coal - up to 24 hours.
For heating, other alternative fuels are used:
- briquetted peat;
- packaged pressed woodworking waste - sawdust, shavings, bark;
- birch charcoal;
- packaged waste landfill products.
Reference! Ordinary sawdust is considered to be the cheapest fuel, provided that their moisture content does not exceed 20%.
A boiler with the same operating parameters can be made independently. Getting started, it is necessary to determine the characteristics of the future unit. Significant parameters for boilers are:
- power;
- duration of burning;
- coefficient of performance (COP);
- maximum permissible working pressure;
- nominal pressure in the system;
- total and useful volume of the furnace;
- firebox depth;
- maximum log length;
- volume of the tank;
- boiler weight.
These parameters will be individual for each type of boiler.
Reference! The heating area depends on the power of the boiler. A boiler with insufficient power will not be able to heat the entire structure completely.
The operation of this type of heat generator is based on the physical property of the heat generated during fuel combustion that is transferred to the heat exchanger. The method of heat transfer depends on the design of the heat exchanger.
The burning duration is affected by:
- fuel tank volume;
- the degree of isolation of the chimney draft from the ingress of air (solid fuel in the furnace should slowly smolder, and not flare up).
The manufacture of the boiler begins with the choice of its design and the task that it must solve:
- For rooms of a small area (garage, a house in the country, an outbuilding), a simple boiler without a water jacket, working according to the principle of an ordinary stove, when heat is transferred through the walls of the structure by convection of thermal air, is suitable.
- heating a house requires a more complex and reliable design. In this case, it should be borne in mind that the heat generator will work continuously for a long period of time.

At the location of the furnace, boilers are:
- with top burning;
- with lower combustion (less productive in terms of loading volume and burning time until the next bookmark).
According to the shape of the case:
- cylinder;
- rectangle.
Necessary materials and tools
The first stage of work is harvesting materials and components. To work, you will need:
- low carbon steel 3-4 mm thick;
Important! Steel grades St 35 and higher are not suitable for conventional welding due to the high carbon content.
- pipe DN50, 150 - for models with a tubular heat exchanger;
- a pipe of rectangular section 60x40 mm - for the manufacture of an air channel;
- equal shelving corner - for grate;
- steel strip 20x3 mm;
- basalt insulation with a thickness of 2 cm (density not less than 100 kg / m³);
- metal sheet (can be coated with polymers) 4-5 mm thick - for the manufacture of doors;

Attention! You can buy ready-made cast-iron doors, selected by the size of the furnace.
- asbestos cardboard - for thermal insulation of doors;
- asbestos cord;
- electrodes
- Control Panel;
- fan;
- temperature sensor;
- handles on the door.
Reference! The control panel, sensor and fan will be used to automatically control the operation of the boiler.
The main tools that you will need to work:
- Bulgarian;
- grinding wheels;
- welding machine;
Attention! It is better to cut a metal sheet into workpieces using guillotine cutting in a production workshop. Manual cutting takes a lot of time and requires additional grinding of the trimmed edges.
- drill;
- roulette;
- marker;
- calipers;
- compressor (for boiler testing).
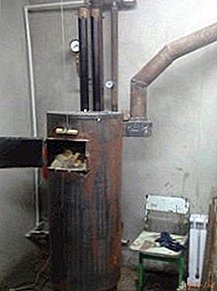
In fig. 1 is a drawing of a simple boiler with a lower combustion chamber arrangement. For the manufacture of a rectangular casing and heat exchanger, low-carbon steel sheets are used. The heat exchanger is designed as a "water jacket." The heat transfer coefficient (COP) is increased due to the design of the protrusions inside the boiler, reflecting the flame and the heating gas.
Fig. 1 Water jacket boiler
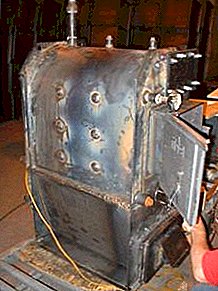
In fig. 2 shows a combined water jacket type heat exchanger (2) formed around the combustion chamber plus a slot register (3) from a steel sheet. The combustion products exit through the chimney (1). Solid fuel (5) burns out at the bottom of the chamber. Below it is the air supply regulator (8).

Fig. 2 Slotted register boiler
Top burning boiler
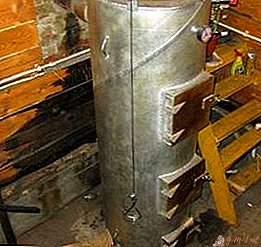
The drawing of the camera is shown in Fig. 3. The cylinder-shaped boiler is made of pipes of different diameters. Air is supplied through a moving pipe that extends upward to release the firebox when it is necessary to load fuel. When burning, it begins to decrease in volume and with it the pipe also drops smoothly down under the weight of its weight. A uniform fuel supply is achieved using a disc welded to the base of the pipe.
The heat exchanger is designed as a "water jacket" enveloping the combustion chamber. Air heating occurs in the upper part of the boiler.
Fig. 3. Boiler with top burning
Consider the example of the most popular boiler with upper combustion (Fig. 3). If necessary, the dimensions can be changed proportionally to those indicated in the drawing. A distinctive design feature is the pipe, which serves as an air supply regulator and a heat exchanger at the same time. Gases emitted during fuel decay rise up and ignite in the upper firebox.
For manufacturing, the materials described in section 2 are necessary: pipes, sheet steel, corner, insulation, asphalt board, electrodes.
The first stage of a homemade boiler includes the following steps:
- A cylindrical body is welded from a pipe with a diameter of 45 cm and a length of 150 cm.
- The bottom is closed by a circle cut out of sheet steel by welding.
- In a pipe of lower diameter (lower part), a rectangular hole is cut out under the ash pan door. It can also be made of steel sheet or purchased ready-made for size.
- The firebox is located in the upper part, a rectangle is also cut out under its door. The door must be insulated with asbestos board and asboshnurom around the perimeter. All doors must be closed with latches.
- A pipe is welded from the profile pipe to exit the smoke, which will be inserted into the chimney.

Important! Due to the temperature difference, moisture (condensate) will form on the surface of the pipe, leading to corrosion, so the welds must be of high quality.
- Legs from an equal-angle corner are welded to the boiler body.
- Cut out the top cover with a diameter of 46 cm, which will be worn on top of the cylindrical body.
DIY heat exchanger for solid fuel boiler
The second stage is the production of a heat exchanger:
- A heat exchanger tube with a diameter of 40 cm and a length of 130 cm is welded from a metal sheet.
- Insert it into the cylindrical body, fix a gap of 5 cm between the pipes, so that a "water shirt" will form.
- The difference in the length of the pipes of the heat exchanger and the outer one must be at least 20cm. The pipe in the pipe is fixed by welding, using prepared metal rings.
- In the upper and lower zones of the water jacket, nozzles are installed: one for supply, the other for the coolant outlet. For their manufacture, a pipe with a diameter of 5 cm is used, a thread is screwed on the outside, through which they will be connected to the pipes of the heating system.
- The distribution pipe through which air will be supplied is welded from a metal of a greater thickness than for the body and heat exchanger (at least 5 mm in diameter with 6 cm). The length of the pipe is 10 cm less than the length of the heat exchanger pipe (120 cm).
Important! The distribution pipe is in the high temperature zone and, over time, deforms and burns out, so metal 5 mm or more thick is used for its manufacture.
- The pipe is inserted into the prepared disc with the finished hole. A metal steel disc with a diameter of 38 cm is welded to the pipe.
- A minimum of 4 corners are welded to the base of the disk, acting as an impeller.
- A valve for a portioned air supply is installed to the upper part of the pipe and a loop is welded on which a chain is fixed to raise the pipe.
Attention! To improve heat transfer, a forced-charge fan is installed in the upper part of the pipe.
How to assemble the boiler
After performing the two main steps, proceed to the final.
The third stage is the assembly of the boiler:
- Choose the location of the boiler, check the level so that there are no differences that can impair the operation of the heat generator.
- The cover with the distribution pipe is pulled onto the housing, after laying the cord. The cover can also be welded to the body.
- The smoke pipe is inserted into the chimney.
- Through the outgoing threaded pipes, the boiler is connected to the home heating system.
- The system is filled with water and the boiler is checked for incomplete loading.
- If the test passes normally, the boiler is loaded at full capacity.
Leave Your Comment